Monday, October 31, 2011

Best Zucchini Bread Recipe
This recipe is really great because you can mix and match ingredients so that any combination is a crowd pleasing one. I made a whole wheat zucchini bread in my bread machine a while ago, so I thought that I would sort of replicate it with this new recipe.

Whole Wheat Zucchini Bread
Step 1
Choose from an apple, pear, zucchini, carrot, shredded. Or a banana mashed. Whichever item that you choose make sure that it equals one cup.
I used zucchini because it is delicious!
Step 2
Choose from: Walnuts, pecans, almonds, hazelnuts, pistachios, dried cherries, dried cranberries, dried currants, raisins, dried figs, dried apricots, pitted dried dates, rolled oats, chocolate chips, and/or sweetened shredded coconut. Whatever you choose should equal 1.75 cups. Any nut combination should not exceed 3/4 cup.
I used 1 cup rolled oats and 3/4 cup chopped walnuts.
Step 3
Grease pan. You can either use 1 9x5 inch pan or 3 6x3 inch pans.
Step 4
Time to make the batter! In a large mixing bowl, combine:
1.25 cups flour (I used whole wheat flour)
3/4 cup sugar
1 tsp baking powder
1 tsp salt
1/2 tsp baking soda
1/2 tsp cinnamon
1/2 tsp nutmeg
Add in your chosen ingredients from step 2 to the batter mixture.

In a small bowl combine:
2 eggs
1/2 cup cooled, melted butter or vegetable oil (I used vegetable oil)
1/2 cup sour cream or plain yogurt (Sour cream was the choice for me)
1 tsp vanilla
1 tsp citrus zest (optional) (I did not opt for the zest)

Whisk all wet ingredients together until well combined. Then add in the choice of your fruit or vegetable to the wet ingredients.

Fold the wet ingredients into the dry ingredients until well combined.

Step 5
Bake! Pour batter into greased pan(s) and bake at 350F for 55 minutes for large loaves or 35-40 minutes for small loaves.

Cool in pan for 30 minutes on a wire rack, then transfer out of pan and on to wire rack to cool completely.
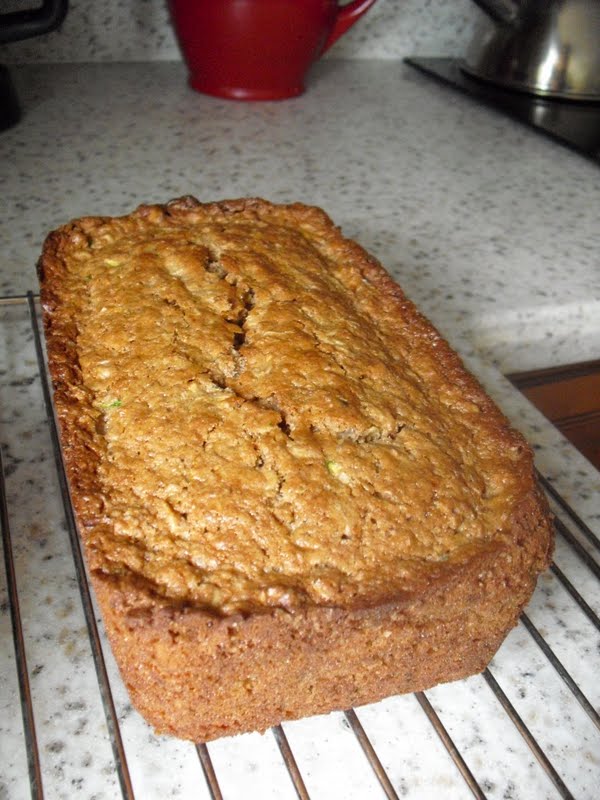
Voila! A scrumptious bread from a wonderful recipe that just keeps on giving.
Lesson 4: Baking Powder vs Baking Soda
I know what you need right now. Science. You need some in your life. To fill that gaping hole that you have buried deep within your heart. It's ok. That's why I am here, to help you. We can take a little adventure down leavening agent road. For breads that are made with yeast, yeast is the leavening agent. It is the go to apparatus that makes the bread rise and what gives bread such an airy texture. Want to do an experiment? Go to your kitchen. Find a slice of bread, like sandwich bread or a baguette. Look very closely at it. You can see very slight holes in the bread where the gas that was released from the yeast was released when the bread was being baked. Fancy. Now if you are so lucky to have a piece of banana or pumpkin bread at hand, you can see that same airy texture is not there. Breads that do not take yeast are dense, rich, and usually moist.
For breads that are made without yeast, the two most common leavening agents are baking powder and baking soda. These two are very different entities. We use baking powders and baking sodas for the same reason we use yeast, to release carbon dioxide when the bread is baking. The use of baking powders and baking sodas, however, are different. We use these when the dough that we are working with is too runny to hold the gas bubbles in (McGee, Harold. On Food and Cooking: The Science and Lore of the Kitchen. New York: Scribner, 2004).


For breads that are made without yeast, the two most common leavening agents are baking powder and baking soda. These two are very different entities. We use baking powders and baking sodas for the same reason we use yeast, to release carbon dioxide when the bread is baking. The use of baking powders and baking sodas, however, are different. We use these when the dough that we are working with is too runny to hold the gas bubbles in (McGee, Harold. On Food and Cooking: The Science and Lore of the Kitchen. New York: Scribner, 2004).

Baking Soda
- Is made of sodium bicarbonate
- Can rise bread on its own, if the bread has the right kind and amount of acids to react with
- Milk will neutralize baking soda

Baking Powder
- Contains alkaline baking soda and acid in the form of solid crystals
- Usually the chemical components are mixed with ground dry starch so that chemical reactions do not occur when in contact with liquids
- When baking powder is added to a liquid it dissolves almost immediately
- "Double Acting": This means that baking powder will help the dough/batter rise when first mixed and then again when it is being baked.
Fun Fact: Baking Soda causes the reddening of cocoa powder when baked. Thus, we have "Devil's Food Cake" source

* Source: McGee, Harold. On Food and Cooking: The Science and Lore of the Kitchen. New York: Scribner, 2004.
Portfolio # 4
I am a very strategic person. I love lists. I make lists about making lists. I love sequential order. Alphabetizing is my second favorite hobby after highlighting. It makes sense then that I love baking, because a recipe, in essence, is a list. That tells you what to do. In sequential order.
The process of baking is a very straightforward procedure. It is technical and leaves a small room for variance. You never have to guess if what you are doing is correct because some brilliant chef has already decided that for you. It is far from the lateral thinking that we so desire in this class. I suppose that lateral thinking has brought us some of the best recipes, so I know that this way of approaching new information is critical.
I have here a great recipe for Snickers Cupcakes. The great thing about this recipe is that it is very straightforward and is not very difficult, I believe that we all have firmly grasped the concept of stirring something in a bowl. If not, then today is the day that we are going to learn something! These cupcakes are a show stopper. They are gorgeous. They are really tasty also! What we are going to do is not only learn how to make an amazing cupcake that will be sure to impress friends, family members, and peers, but also learn how this process is kind of like running. We are thinking laterally.
Snickers Cupcakes

Recipe from www.mybakingaddiction.com
Makes 24-30 cupcakes
For the cake:
1 (18.25 ounce) package devil’s food cake mix
1 (5.9 ounce) package instant chocolate pudding mix
1 cup sour cream
1 cup vegetable oil
4 eggs; lightly beaten
1/2 cup warm water
1 teaspoon of vanilla
24-30 frozen Snickers Miniatures
1 (18.25 ounce) package devil’s food cake mix
1 (5.9 ounce) package instant chocolate pudding mix
1 cup sour cream
1 cup vegetable oil
4 eggs; lightly beaten
1/2 cup warm water
1 teaspoon of vanilla
24-30 frozen Snickers Miniatures
Method
1. Preheat oven to 350 degrees F.
2. Line (2) 12 cup muffin tins with paper liners.
3. In a large bowl, mix together the cake and pudding mixes, sour cream, oil, beaten eggs, vanilla and water.
4. Evenly divide the batter amongst the prepared pans.
5. Gently push a frozen Snickers Miniature bar into the center of the batter and smooth the surface making sure to cover the candy bar with batter.
6. Bake for 18-22 minutes, or until top is springy to the touch and a wooden toothpick inserted comes out clean.
7. Cool cupcakes thoroughly on wire rack.
For the frosting:
2 sticks unsalted butter; room temperature
1/2 cup shortening
2 teaspoons pure vanilla extract
1 1/2 pounds confectioners’ sugar
1/3 cup caramel topping; plus more for drizzling
1/4 teaspoon salt
2 sticks unsalted butter; room temperature
1/2 cup shortening
2 teaspoons pure vanilla extract
1 1/2 pounds confectioners’ sugar
1/3 cup caramel topping; plus more for drizzling
1/4 teaspoon salt
Method
1. Cream the butter and shortening in the bowl of an electric or stand mixer. Add the vanilla extract, salt and caramel syrup and combine well.
2. Begin adding in the sugar and mixing thoroughly after each addition. After all of the sugar has been added and mixed thoroughly, give it a taste and decide if you want to add in more caramel syrup. For thicker frosting you can gradually add in a little more sugar.
Garnish with chopped Snickers bars and a drizzle of caramel of caramel syrup.
Here is part of a 6-week 5k Training Plan
5k training Plan
Week 1
Monday: Walk briskly for 1 mile. Run 2 minutes every half mile until you reach 3.5 total miles. Walk 0.5 mile.
Tuesday: Walk 3-5 miles.
Wednesday: Off
Thursday: Walk 1 mile. Run 3 minutes every half mile until you reach 3.5 miles. Walk 0.5 mile.
Friday: Off
Saturday: Walk 3-5 miles, including 10 run/walk intervals (run 30 seconds, walk 1 minutes) in the last mile.
Sunday: Off
Week Total: 16-20 miles
Week 2
Monday: Walk 1.5 miles. Run 5 minutes, walk 5 minutes; do 3 times. Walk 1-2 miles.
Tuesday: Walk 3-5 miles.
Wednesday: Off
Thursday: Repeat Week 1 Thursday.
Friday: Off
Saturday: Repeat Week 2 Monday.
Sunday: Off
Week Total: 18-20 miles
So, how do these two connect? In a recipe you always are given the list of ingredients first. This makes sense. You do not want to be halfway through mixing and realize that you need baking powder when all you have is baking soda. These two items are not interchangeable. This is similar to training for a race. You need to find a race to run in, have the means to get to the race, and even find and/or make a team.
After the list of ingredients, there are always step by step bullet points for you to follow to ensure that you complete each step in the order that it needs to be in, so that you do not ruin your batter and that your resulting baked good is the best that it possibly can be. In running, you have a training plan. A training plan outlines what you have to do each day so as to train your body, build endurance, and make sure that you do not injure yourself.
As far as I can see. These two processes are almost identical. One is tastier, but that is besides the point.
Portfolio # 3
Happy Halloween!
On October 1st of this year I completed my first 5k. It was an amazing experience! I have always enjoyed running and I thoroughly enjoyed my first race, so much so that I am now looking for my next race. One of my goals in life is to run a marathon. I know that it takes a lot of hard work and an incredible amount of dedication to complete such a task, but I truly believe that it is.
One of the most daunting tasks in preparing for a race is how to properly train. It is essential to have enough time to develop endurance, build muscle, and recover. One of the fastest growing trends in the world of running is the run-walk method. This method was developed by Jeff Galloway, an avid runner and a familiar face when it comes to marathon races. He has developed a system in which a runner takes breaks during long distance runs. Instead of slowing the runner down, his method has proven to better the time of many runners.
How could this be possible? After many trials, many runners continually recorded significantly faster times because they did not have to decrease their speed at the end of a long run. The muscles of the legs, when continually used at such intense paces, like during a marathon run, tire very quickly. These muscles tire because they are used in the same capacity for hours on end. By taking walking breaks, one is using a different set of muscles, allowing for a more used set of muscles to have enough time to repair. Using a run-walk method then displaces the tedious task of running long distance over several different muscle groups.
To use the run-walk method during a marathon, a runner must only utilize this method up until the 18 mile. The run-walk method has the best effects when a runner uses the technique immediately, not when they begin to feel fatigue. Galloway also has described a training pace for a correct run-walk ratio:
8 min/mile- run 4 minutes/ walk 35 seconds
9 min/mile- run 4 minutes/ walk 1 minute
10 min/mile- run 3 minutes/ walk 1 minute
11 min/ mile- run 2:30 minutes/ walk 1 minute
12 min/mile- run 2 minutes/ walk 1 minute
13 min/ mile- run 1 minute/ walk 1 minute
14 min/mile- 30 second run/ walk 30 seconds
15 min/mile- 30 second run/ walk 45 seconds
16 min/mile- 30 second run/ walk 1 minute
Running in a race was one of my greatest accomplishments. It instills a lot of pride in oneself, knowing that you can put your mind to something and complete it. I highly recommend that everyone try it out, you will not be sorry!
Thursday, October 27, 2011
Fantastic Bread Machine Recipes
Old World Rye Bread Recipe


Recipe from Betty Crocker Cookbook for Bread Machines
For a 1.5lb loaf (12 slices, unless you live in my house then 8 slices) you will need:
3/4 cup plus 1 Tbsp warm water (105-110 degrees F)
2 Tbsp butter
1/2 cup shredded zucchini

1.5 cups whole wheat flour
1.5 cups bread flour
3 Tbsp dry milk
1/4 cup white sugar
1 tsp salt
1/2 tsp cinnamon
1/4 tsp cloves
Add last!!
2 tsp active yeast


Combine all ingredients in bread machine pan in the order as listed.
Set bread machine to desired loaf size, crust color, and setting (I used the whole wheat setting).

Let it do its thing!
I love watching the bread machine mix all the ingredients, it is addicting and far superior than television :)
3 hours later...


Swirly bread with cornmeal and flour sprinkled on top.

Crusty!
Crusty Rye Bread
(for bread machines)
2/3 cup water at 105-110 degrees F
2 Tbsp vegetable oil
2/3 cup of buttermilk
1.25 cup of bread flour
1 cup rye flour
1/3 cup mashed potato mix, dry variety
2 Tbsp brown sugar, packed
1.25 tsp salt
2 tsp bread machine yeast
Place all ingredients in bread machine, starting with the liquids and ending with the yeast. Be sure to keep the yeast out of contact with the liquids or salt. Select dough/manual cycle and let it rip!
Remove dough and place on a lightly floured surface, cover, and let rest for ten minutes.
On a greased cookie sheet, sprinkle cornmeal.
Roll dough with hands into a 25inch rope. Curl the rope into a coil shape and tuck the end underneath the dough. Place on cookie sheet and let rise 45 minutes, meanwhile heat oven to 400 degrees F.
Brush water on top of dough, and sprinkle with cornmeal and a tad bit of flour.
Bake 25 minutes or until golden brown. Remove from pan and onto cooling rack.
Whole Wheat Zucchini Bread
For a 1.5lb loaf (12 slices, unless you live in my house then 8 slices) you will need:
3/4 cup plus 1 Tbsp warm water (105-110 degrees F)
2 Tbsp butter
1/2 cup shredded zucchini

1.5 cups whole wheat flour
1.5 cups bread flour
3 Tbsp dry milk
1/4 cup white sugar
1 tsp salt
1/2 tsp cinnamon
1/4 tsp cloves
Add last!!
2 tsp active yeast


Combine all ingredients in bread machine pan in the order as listed.
Set bread machine to desired loaf size, crust color, and setting (I used the whole wheat setting).

Let it do its thing!
I love watching the bread machine mix all the ingredients, it is addicting and far superior than television :)
3 hours later...

Voila!! Zucchini bread!

Lesson 3: What is a Bread Machine?
Baking has been around for a very long time. I mean a very long time. That being said, the world of baking has made some great advances making it not only easier for the average Joe to do, but also making it more accessible for more people. One of the greatest inventions in the history of baking, in my opinion, is the bread machine.
Bread machines are basically a one step process for making any sort of bread, without really having to do it with your own hands. I mean, I love baking and everything that goes with it, but I do have a life outside of the kitchen. Bread machines are literally a machine, that has a bucket/baking pan, a kneading paddle, heating/baking element, and several different programs. You can choose which program you want based on what kind of bread or dough you would like to make.
As with any aspect of baking, there are specific rules to using bread machines. The order of the ingredients that you put into the bread machine is critical, it should go a little something like this:
- Liquids (water, butter, etc.)
- Flour
- Sugar, Salt, other seasonings
- Always always always add the yeast last.

The programs will vary in baking, kneading, and resting time based on what program you have selected. Also there is the convenience of choosing the kind of crust color you would like and what size loaf you would like.
Great video!
Subscribe to:
Posts (Atom)